Acoustics @ Work
Now that I’ve had my panels up in my studio for a few weeks, it seems like a good time to talk about how they’re working. If you missed my acoustics article a few weeks back, you might want to check that out because some of this is going to build on that.
First, I’ll just say I’m really happy with where my studio is at now. Like, really really happy. I honestly feel it is one of, if not, the best sounding studio I’ve worked in, and I’m not just saying that because I put it together. I’ve put together a few rooms in the past, but this one easily tops those. Some of that comes from advances in technology, but it’s probably more a matter of experience at this point in my career. All I know is I have to be careful about putting music on in my room because I have a tendency to just sit and listen and listen and listen. I still have some dreams and future plans down the line, but right now it really fits the way I enjoy working.
So, let’s talk about what I did in the room. First up is the new acoustic treatment which are essentially broadband-ish absorbers. These were intended to do a couple of things. First, they absorb low frequency reflections. This goes back to my article on acoustics where I talked a bit about room modes. By absorbing some of the energy of the reflections in the room, the modes are reduced. It would take more absorption than I could realistically put in my room in order to completely eliminate the modes, but the added absorption definitely helps.
Second, the absorption eliminates, or at least drastically reduces the early reflections at the mix position in the mid and high frequencies. These frequency ranges can be critical for how our ears localize things, and I think this brings up some interesting stuff.
One of the big changes in my room is the imaging in my sweet spot where I mix. It’s pretty ridiculous now. A lot of people tend to attribute this kind of thing to particular speakers, but based on my understanding of the physics of sound and how we perceive where things are in space, the speakers are really only part of the equation and probably the smaller side of it.
The way we localize things and perceive imaging is primarily based on the time arrival differences of a sound at our ears. Basically, our localization ability comes down to which ear hears something first. When the walls in our room are close to us and a sound comes out of a speaker, those reflections in the room can smear the sound along with our localization perception. So I have a couple of takeaways from this.
Speakers thought to image well often do so based on the control they provide over mid- and high frequency content. In other words, they put more sound in our ears than they spray on the walls and other surfaces around us so we get the majority of our imaging cues directly from the speakers. Based on that, I would also speculate that speakers said to have a wide sweet spot most likely throw sound wider and may have less control. Of course, at the end of the day a lot of this is pretty subjective anyway. I guess my point is, I don’t buy into a lot of the speaker hype that gets tossed around because a speaker’s performance is largely dictated by the acoustic space which brings us back to my studio.
The room is formerly the dining room of our house. Prior to the studio, it housed our media room until we moved that to a bigger room directly behind it. The room dimensions are approximately 10 1/2′ wide x 15′ deep with a 9′ ceiling. The back of the studio opens into our media room which adds another 12′ to the depth. The header above the opening that divides the two rooms does create some acoustic issues, but it’s still better than having a wall at the back of the room.
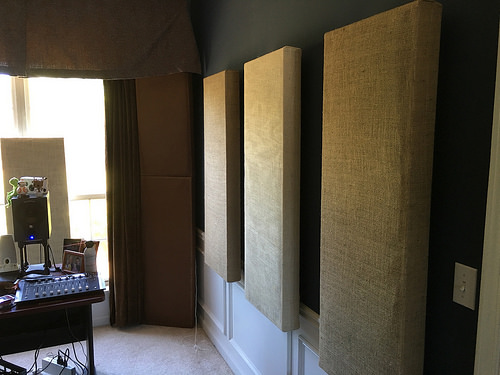
I built and installed a total of 12 acoustic panels in the room. Each of the panels is about 16 1/2″ x 48″ and 4″ deep, but the insulation in them is only 3″ deep so there is a natural 1″ air gap built into each panel which increases their effectiveness.
The theory behind these is as sound passes through the panel, the panel absorbs acoustic energy. Then as the sound reflects off the wall behind the panel and back into the panel, we get more acoustic energy absorption. Leaving just a little bit of a gap between the wall and absorptive material helps which is why I have the 1″ in the panel, but the theoretical optimum gap should be equal to the depth of the absorptive material.

In terms of treatment placement, straddling each corner in the front of my room are two stacked panels. Corners tend to be big reflection points where low frequency builds up so I treated these nearly floor to ceiling. Incidentally, this is also why having a wall directly behind your FOH position can be problematic. Corners happen wherever a wall meets another surface so we also have a corner where the floor meets the wall and where the ceiling meets the wall. It might have been ideal for me to to also put treatment where each of my walls meet the ceiling, but I didn’t endeavor hanging those so I figured I’d save those for a future round of treatment if necessary.
Three panels hang on each side wall roughly centered vertically on the wall and cheated down a bit so the top of the panel is maybe 6″ above me when I’m standing. The front panel was placed at the first reflection point of my speakers which is the first place on the wall sound will hit and reflect directly to the mix position. This is probably the most important point to treat. The other panels are then spaced about every 10″, but there’s no technical reason for the spacing. I wanted a bit of space between them, and 10″ worked in order to fit them on one of the walls before a light switch and doorway. Each panel has spacers behind it which increase the total air gap behind the panels to 3″. The panels were hung using picture wire frame, and the spacers are just pieces of 2″ scrap wood left over from building the frames.

Ceiling Cloud Rigging
The final two panels were hung in a cloud over the mix position. Again, these were placed based on the speaker’s first reflection on the ceiling. The panels are about 12″ off the ceiling. I would probably get more LF absorption if they were closer to the ceiling, but I think it would have been harder to hang them. Plus, I like the way they look where they’re at.
These panels were hung similar to the wall panels. I have hooks screwed into the ceiling joists which, by the way, weren’t easy to find because they’re not spaced 16″ apart in my house. Then I used more picture wire on the backs of the panels to hang them. I also added chains to these for additional safety in case the wire comes loose.
Overhead is an area that I’ve neglected in rooms in the past, and I see think a lot of guys try and skip it because in truth it’s much harder to treat than side walls. However, I did some experiments with Smaart holding cloud panels in place and removing the, and it was a very measurable difference having the cloud.
So how does it sound with the treatment?
The best way I can describe it is everything feels tighter. I also hear more definition and fullness.
Tonally, the room hasn’t changed a ton. You can see a before and after measurement of one of my monitors right after installing the treatment below; the greener trace is the new measurement. The response is a little smoother with the treatment, but fundamentally it’s very similar. That big 143 Hz dip is likely due to a room mode, and according to Carl Tatz it’s typical to have an issue in that frequency area in small rooms using nearfields. I made some more adjustments to the room after those measurements, and I believe some of this is already further improved than this measurement shows.

The frequency response brings up an important point. I tune my studio monitors using corrective EQ.
Traditionally, the thinking goes that you only treat the acoustics when it comes to a studio. You get the acoustics right, and then you play the game of swapping your monitors until you find some you like that get you the results you want.
I bought into this line of thinking for a long time, however, after years of tuning PA’s and working on getting my mixes to translate beyond the big room, I’ve kind of gotten over this idea. I’ve also read several articles and listened to several interviews with guys who design and tune studios like Bob Hodas and Carl Tatz and all of them talk about using DSP to tune studios. I’m convinced now that the idea you shouldn’t EQ your studio monitors is a myth. Granted, I think it’s still best to use the minimum amount of EQ in pretty much any audio situation, however, I have no fear of using EQ on my studio monitors to do what is necessary.
One last thing I’ll mention is in addition to the treatment, I also moved my monitors. They were originally set up as an equilateral triangle with the mix position at one corner of the triangle which is the “traditional” way to place studio monitors. It was working, but I think I expected more improvement from installing my panels so I started looking into other areas when the effectiveness of the panels was pretty evident just walking.
So I took some advice from Carl Tatz to get started. Then I employed a couple tricks I do with Smaart and capped the whole thing off with EQ’ing the monitors. The final product from these moves got me what I was looking for. The low frequency improved, and as I mentioned the imaging is pretty ridiculous. Right now my studio is probably my favorite place to work so I’m sure I’ll have more to say about this in the future. In the meantime, if you have questions for me about any of this or setting up a studio in general, please ask them in the comments for the article.
 Previous Post
 Next Post


Hey Dave,
Thanks for posting the article about your studio, very helpful for the DIY guy. Here’s a couple of quick questions:
1 – How are you applying the corrective EQ to your monitors? Is it in the Box or something external?
2 – Have you come up with a name for your studio yet? All great studios have names:)
I currently use a plug-in in Pro Tools called Sonarworks for EQ’ing my monitors. However, at some point I would like to offload this to a dedicated DSP box. No name for the studio just yet, but I do have some ideas.