A New Magic Box
About five years ago Rupert Neve Designs released the Portico 5045. I did a little write-up on my initial experiences with it HERE, but needless to say there was a reason a lot of us started calling it the “Magic Box”. To this day I hate mixing headworn or lav-style mics without one.
Those of us who became addicted to our 5045’s often talked about how we would love to have something like it in plug-in form, and this week Waves made our dreams come true with the release of their Primary Source Expander plug-in. I don’t know if the Waves PSE works the same under the hood as the hardware 5045. All I know is I’ve been very happy with the results I’m getting from my initial testing of the plug-in and at its current price of $49, I think the Waves PSE is an absolute steal. In full disclosure, I am endorsed by Waves, but I bought the PSE flat out on my own. If you follow my LINK to Waves’ website I think you can also get an additional 10% off.
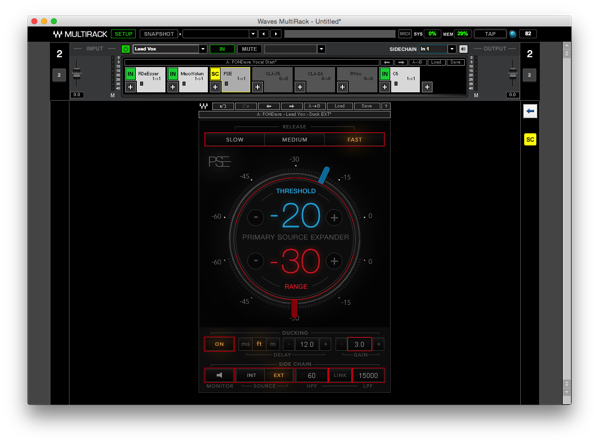
With that out of the way, I want to offer a few tips on using the PSE because it has a feature you won’t find on the 5045 that I think a lot of people are going to initially overlook. If you take a look at the plug-in, at the bottom you will see a section called “Ducking”, and in my opinion this makes the PSE more powerful than a 5045 alone.
From what I understand based on my own testing, Ducking basically lets you to desensitize the processing a bit.
So why would you want to do that? There are a couple of reasons I can see this, but the big one I’ll use it for is this:
Let’s say you have a loud stage so you throw the PSE on each of your vocalists to clean up the stage bleed in their mics. You get your threshold just right for each vocal, but the snare drum on stage still pops the PSE open. Enter the Ducking feature.
The way Ducking works is dependent on which “Source” you select in the “Side Chain” section. In this instance, we want to select EXT for External, and then we need to set the Sidechain of the PSE to our problem which, in this case, would be the primary snare mic. In the MultiRack setup pictured below, I have my snare coming into “1”, and the vocal I’m working on is in Rack 2.

By enabling Ducking, we are essentially telling the PSE to ignore the snare hits when it’s listening to our channel by ducking on those hits. So when our vocal sings, it can open the PSE, but if only the snare is playing, that snare won’t open it as easily. You can adjust the sensitivity of this by adjusting the Gain on the Ducking section, but you can see in the photo that I went pretty high with it(it defaults to -48 dB). This was just what worked the best for me with the input I was using.
One last thing you need to do, though, is set a proper delay for the Ducking section. If your drummer is 12 feet away from your vocalist, that means the snare is going to arrive sooner in the snare mic than in our vocal mic. So we need to delay the sidechain relative to the snare’s arrival at our vocal mic so that the PSE ducks when the sound from the snare arrives at the vocal mic. You can get nit-picky and measure this out using the waveforms on a recording in your DAW of choice, or you can rough it in based on the approximate distance between the two.

Now, you might be thinking, “Hey, that’s great if my singer is always in the same place, but what if they like to roam the stage?”
On a roaming vocal, I would opt for the INT setting for the Ducking. I’m a little unclear on exactly how this works from a technical standpoint, but from playing around a bit it seems to essentially smooth out the behavior of the PSE. In my testing it also seemed to reduce sensitivity to the bleed I was trying to reject while smoothing out the behavior of the PSE. In a run-and-gun situation, I would probably opt for this setting on a problematic vocal since it’s a lot faster to setup. I would probably also play with this on an input I may tend to leave a little more dynamic such as a live talking head.
For my testing I used old some tracks I had of a vocalist who was ALWAYS challenging for me in terms of stage bleed and gain before feedback. The Neve 5045 usually helped on her, but because of the volume of bleed in her mic relative to her own voice, it was difficult to get the threshold right on the 5045 to get it working the way I wanted at all times. Both of the settings pictured here on the PSE, however, worked quite well on her vocal and typically gave me about 15 dB of reduction when she wasn’t singing which would be more than enough for me to clean things up and eliminate feedback in an actual live setting. I listened to the vocal both in solo as well as in the context of a mix, and I was happy in each case.
On most vocals I will probably start with the Threshold around -20, Range between -10 & -20, and a Medium Release. Then I’ll adjust from there. The + & – buttons on the interface should make this a breeze to adjust live as well.
One last tip I will add is I seemed to prefer the results when I inserted the PSE AFTER the primary compression I was doing. Your milage may vary, though, so I’d suggest trying it both ways to see what you prefer.
I made some initial presets for the PSE you can download HERE. This thing is really easy to get started with so I don’t think you’ll need presets, but these have some of the Ducking settings in there that were working for me. Just remember if you do use the Ducking feature with something like a snare drum, make sure you get the Delay set right for your particular situation.
Have fun with this plug-in, and let me know how it’s working for you and what you’re finding in the comments below.
 Previous Post
 Next Post


