Tickle the Vocal

This is the kind of advice I consider a little dangerous because it initially involves looking at meters rather than listening. I think it can help you start figuring things out, though, so here’s a quick tip for compressing vocals. It’s not THE way, but it’s “A” way.
Compressor controls are an endless source of confusion amongst engineers and even manufacturers. I’ve been digging in on this for years now and even spent several months studying schematics a few years back. Looking at those, it’s crazy to me sometimes how far apart explanations we get are on what these controls do compared to what I understand is actually happening under the hood.
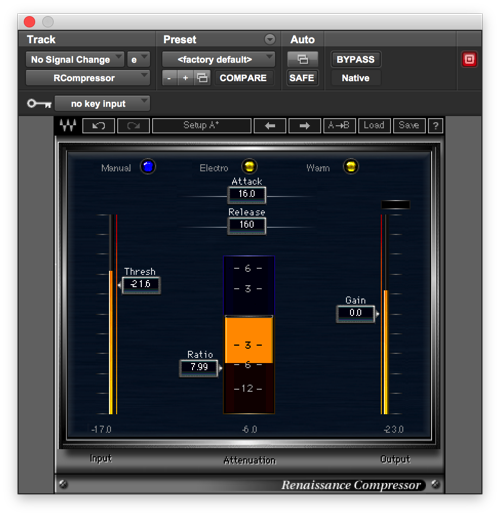
One of the first points of confusion is on how to set the Threshold for a compressor. Threshold is about what part of the signal is going to get compressed. The compressor will work on everything that is above the threshold. Threshold is not about “how much” compression we’re doing, although, it can be used to control that to a certain degree.
When it comes to a vocal, I usually want a compressor to act on the vocal almost all the time especially if it’s a dense, full band mix. It’s not a rule, and it’s OK to me if it releases completely in places. For the most part, though, I’m going to have that compressor doing something whenever someone is singing.
So, a good place for me to start in setting the threshold is to adjust it so the gain reduction meter is at least just getting tickled most of the time when the ratio is set fairly low like around 2:1. Starting on a quiet part of the song is usually a good place to judge things in this regard. It’s OK if it’s not getting compressed here and there, but I’m looking for a tiny bit of gain reduction happening 85-95% of the time. At the same time, though, I also want to make sure I’m not burying the needle the entire time, but that shouldn’t be an issue with a lower ratio.
What this approach does is tell the compressor, “Hey, I want you to work on that vocal the entire time.” Some newer consoles and plug-ins make this even easier to set by showing where the threshold is relative to the incoming signal. In those cases I simply want to make sure the vocal is above the threshold at all times, and the noise floor/bleed into the mic is always below the threshold.
Now, this approach to the threshold does NOT tell the compressor how hard I want it to work. That’s what the ratio is for.
Once the threshold is set this way, the RATIO control may be adjusted to control how much compression is actually happening. This is generally done best in the context of the mix with the rest of the instrumentation playing in order to get the dynamics of the vocal to match more closely with the band. As you adjust the Ratio, you may also need to add some makeup gain to compensate for gain reduction that’s happening. Generally, the gain reduction bounces between 3-6 dB for me with an occasional dip to 10 dB’ish or more. If I feel like those big dips sound too squashed, I have some other strategies I’ll try, but I’ll save those for another time.
Reading about compression and audio techniques is one thing, but it’s something else to have someone standing right next to you helping you out with your band and vocalists in the room where you mix on a regular basis. I’m starting to book training visits for the spring, and I would love to chat about how we can take your mixes to the next level this year. Find out more by connecting with me through my contact page.
 Next Post


