
Venue Hack: Make Your Own Plugin Installers
Sheldon had a good post over on the DUC about a digital console survival kit. While I’m not doing many gigs outside of my house gig, I still have a kit together which consists of two USB drives. One of the drives has all my show files and some favorite presets, and the other contains my favorite plugin installers. Both of these drives also come in handy for the occasional Venue update that wipes the drive.
One thing that has frustrated me at times when I’ve had to reinstall anything has been the plugins that lack Venue installers. But I did a little messing around one day and figured out how to build my own Venue “installers”. This allows me to insert one USB drive and install everything without exiting to the desktop which greatly speeds up the process.
*** Bear in mind that this isn’t an officially sanctioned and certified technique, and if you’re going to screw around on the OS side you are doing it at your own risk. ***
So the Venue installers aren’t really installers at all. What it really comes down to is putting the right files in a file structure that the console software recognizes so that the console software will automatically put those files where they belong. Once you understand this structure, you can fairly easily create your own plugin installers. This will only work with plugins you have already installed so you’re going to have to go through the trouble of exiting to the desktop at least once to install it the first time, but that is also a good time to make your new backup installer.
Once you have a plugin you want to make an installer for, the first thing you need to do is get your USB drive ready. This is best accomplished on a Windows system, but I believe you could do it on the Venue as well if you exit to the desktop. At the root level of your drive you will need a folder called “TDM Plugins”. This is where the Venue looks for your installers. You might have already dumped some official Venue installers in here before.
Within the “TDM Plugins” folder, create a new folder with the name of the plugin you want to create an installer for. Bear in mind that this folder name is going to be the name you will see within the Venue software’s interface. Sometimes you’ll find files for plugins that have odd characters in them, and you’ll want to leave those out of the folder name. You can put them in there, but it’s probably going to make it harder to find this plugin later so just name it what you want.
Now within your new plugin folder, you need to create two more folders. Call one of them “DAE Plug-Ins” and the other “Presets”. The DAE Plug-Ins folder will contain the actual plugin and the Preset folder is where you can stick the factory presets.
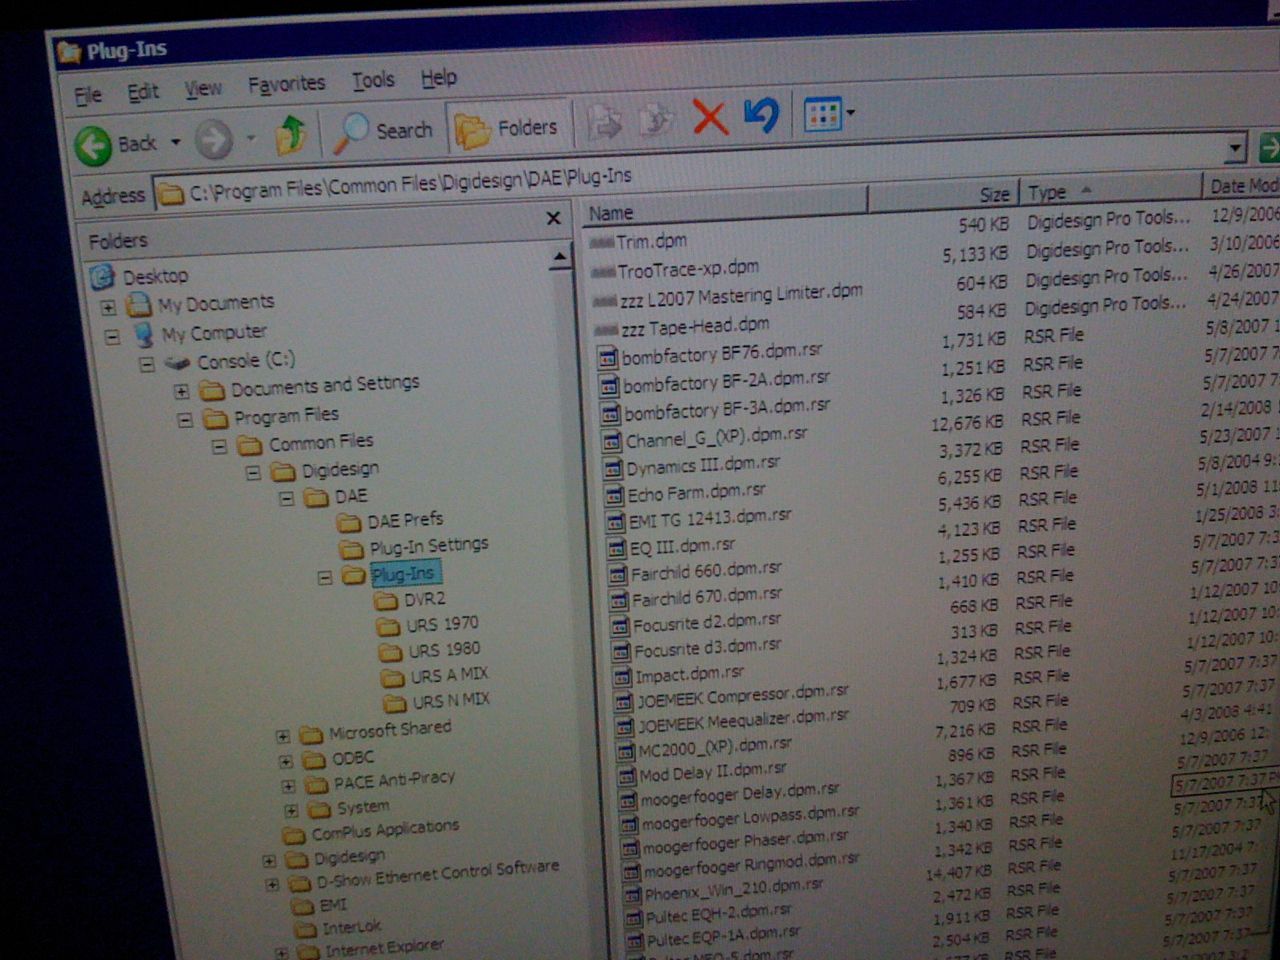
Now you’ll need to go find the actual plugin files. If you haven’t exited to the desktop (hold down CTRL and click on Shutdown on the Options tab), you’ll need to go there now. Click on the Start button and pull up My Computer. You’ll see that there are two drives; these are actually the same hard drive just with different partitions. One of the partitions is for the system files and the other is for user data. The plugin files are going to be on the system drive which is called “Console”. You can find all the plugins in the DAE folder on this drive. This is located in “Program FilesCommon FilesDigidesignDAEPlug-Ins”. Within this folder you’ll see a whole bunch of files along with maybe a few more folders. You’re going to be looking for two files for each plugin. They will probably be named the same, but they will each have a different extension. One of the extensions is “.dpm” and the other is “.rsr”. Locate these two files and copy them into the “DAE Plug-Ins” folder on your USB drive.
At this point you can call it quits because your installer is ready to go. Optionally you can also add FX presets to the installer, but first you’ll need to locate the presets on the console. These are stored on the “User Data” drive. You can find them here: D-ShowUser DataEffect Presets. The factory presets will be in the folder “Factory Presets”. Just locate the folder for you presets and drag that folder into the “Presets” folder on your USB drive. Now, I’ve honestly never bothered with this because I keep all the factory presets on my other USB drive with my show files, but theoretically this will work as well. The only thing you should do is remove the brackets and extraneous characters listed within from the plugin folder on your USB drive.
This isn’t an overly complicated thing to do, but it’s still a bit of work and definitely not for folks unfamiliar with a Windows file structure or uncomfortable mucking around on computers. If you’re thinking about doing this, just be smart and have your System Restore disk handy along with your original plugin installers and you can always reformat the whole thing. I haven’t had any problems with this, yet, but you’ve been warned and I am not responsible if you mess up your console because you followed one of my crackpot ideas.
 Previous Post
 Next Post


I am intrigued that the core hardware for the digi console is wintel and not macintel. PT is generally understood to be pretty stable on either platform, so I wonder if the PC hardware is a function of cost, mechanical durability, ease of replacement parts, or something else?