Tool Tips – 76’ing
Lately I’ve been running across engineer’s employing 1176 style compressors, but I’m not sure everyone is getting the most out of these so I wanted to offer up some tips based on my experiences using 1176 style compression. I’m going to talk in terms of the Waves CLA-76 plugin today because it has been my go-to for this style of compression for many years, but these tips should translate to most 1176 or FET style compressors and plug-in emulations.
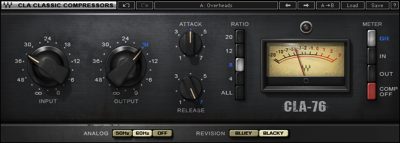
I’ve been a big fan of 1176 style compression, for a long time, and the Waves CLA-76 is a staple in most of my mixes. Aside from its unique tonal color, for me part of the beauty of this compressor style lies in the speed of the compressor. An 1176 is a very fast compressor. In fact, if you look at the face plate of the hardware you will be hard pressed to even find the word “compressor.” The 1176 classifies itself as a Limiting Amplifier, and limiters generally have faster settings in order to limit and/or protect signal levels from getting out of hand.
A traditional 1176 basically goes from stupid-fast to ludicrous-fast. From my research I found that a traditional 1176 has an attack time ranging from 20 microseconds to 800 microseconds. Release times aren’t quite as speedy ranging from 50ms to 1.1 seconds, although, that 50ms is still on the pretty fast side of things. One thing to keep in mind, though, is these settings are also somewhat Program Dependent meaning what you put into the compressor will also affect exactly how things behave.
These speeds and program dependent behavior make 1176 style compressors ideal for controlling and leveling things. The smaller range of settings on these controls–at least in terms of attack–also makes these compressors easy to setup, and in my opinion, it takes work to make these sound bad at moderate levels of compression. The downside to this, though, is for newer engineers it can be easy to fall into the trap of wondering if you’ve set one up right. I don’t know that there’s necessarily a right way to set these up, but I have found I prefer the results I get when I set things in a specific fashion.
Before we get into that, though, I want to straighten out a big point of confusion for ’76 first-timers and even many veterans. The attack and release controls are opposite from most other compressors. On an 1176 style compressor, a LOW number setting is SLOW, and a HIGH number setting is FAST. If you turn a knob all the way counter-clockwise, you are on the slowest setting, and this leads to my first tip:
’76 Tip #1: Set the Release as fast as it’ll go.
95% of the time I always have the Release as fast as it will go. I see similar settings in most studios I visit, and I know the engineers I admire most rarely move their ’76’s off this setting. For me, the ’76 typically sounds more exciting at this setting, and while still good at slower settings sometimes I feel like I’m losing something. The slower setting usually just isn’t as fun for me.
Probably the only exception for me on this would be when compressing a bass or instrument with lots of low frequency content. At its fastest Release setting, the ’76 will often distort at low frequencies because the release is so fast it ends up square-waving those frequencies. This distortion isn’t always bad, though, so don’t be too quick to remove it. When I don’t like the distortion, I just slow the Release until the distortion disappears which in my experience is typically just shy of reaching 3 o’clock.
’76 Tip #2: Start with the Attack straight up.
In general, I always start with the Attack set at noon. I’ve found this to work great on a majority of things such as drums and vocals, however, I often slow things down from there depending on the input in order to try and get a little more punch and/or articulation out of things. Oftentimes this is simply a feel thing for me. One exception to this might be on an instrument that is particularly attack-y to begin with such as an acoustic guitar. If it’s too “plucky”, I might go faster on the Attack until it smooths out the front edge of the playing. But for 95% of things, I start at noon and slow the Attack from there.
Tip #3: 4:1 is your friend.
There’s something about 4:1, and I think I mentioned this earlier this year. I rarely use anything other than 4:1 on most compressors and especially the CLA-76. There are times when I’ve used a higher setting on the CLA-76 usually on something like a bass guitar that I really wanted to control, but 4:1 is usually the money setting for me.
One exception to this would be the All Buttons in mode. It’s hard to explain exactly what this does, but when it works it tends to really work in a cool way. Typical applications for me for pushing all the buttons in are vocals and sometimes overhead mics or room mics in the studio. The All Buttons in mode makes the compressor’s meter go crazy and adds a bit of grit to things so try not to get caught up in the metering and just listen.
Blue or Black?
There are a variety of revisions of 1176’s floating around. The most popular feature either a blue stripe on the faceplate or an all black faceplate. The blue stripe is the Rev. A which was the first 1176 while the blackface ones are probably Rev. C, D, E, or else a modern reissue. In the CLA-76 plugin, I find the Bluey to sound a little more aggressive with a bit of a bump in the mid-range. In my studio, I often like the Bluey on vocals, however, in the live arena I tend to favor the Blacky since the Bluey can sometimes get a little harsh in the upper-mids for me on modern PA’s. It’s hard to go wrong with the Blacky, though.
Chasing Magic
Here’s a good place to start if you’re sticking a ’76 on vocals. Set the Ratio to 4:1, the Attack between 10 o’clock and noon, and the Release all the way clockwise. Adjust the Input so you’re kissing gain reduction on a quiet vocal and adjust the Output to taste. Then just listen to things. Don’t worry about how much gain reduction you’re doing. Just listen, and see if it sounds cool. The vocal should even out in dynamics and may feel like it’s coming forward and/or standing up in the mix. You might also try setting the Attack all the way counter-clockwise as that’s another popular place to put it in this application.
On a snare drum, start with similar Ratio, Attack, and Release settings. On an average section of the song, set the input to try out different amounts of gain reduction. Listen to what happens to the snare when you hit 1 dB, 3 dB, and then up to 5+ dB of gain reduction. With great drummers, I often just kiss the gain reduction whereas with lesser drummers I will often hit things a little harder. I’m listening for magic, weight, and consistency. When the ’76 is the right compressor, one of those gain reduction amounts will typically make the drummer sound like he’s a better drummer playing harder and more solid.
These days, the most common place I use the CLA-76 is on bass guitars especially in the live world. On the VENUE, I used it on snare drums for many years, although, these days I sometimes end up simply using the channel compressor. On vocals, it’s often the first thing I’ll try especially if I feel like the vocal needs to be a little more exciting or commanding.
If you have access to the CLA-76 or some other 1176 style compressor, try it out on a variety of things. It’s an incredibly versatile compressor, and if you’re only doing 3-6 dB of gain reduction it’s typically hard to mess things up with it.
Do you have a favorite input or settings you like to use with the style of compressor? Leave a comment because I’d love to hear about it.

 Previous Post
 Next Post


For snare, I usually start with the CLA-76 Bluey, 4:1 ratio, fastest attack, slowest release, doing 3-6db of gain reduction. Once that channel is up and feeling pretty good in the mix, I’ll duplicate it (EQ and everything), and insert an 1176 on the new channel doing pretty much no gain reduction. I’ll bring that channel up until the snare “punches” a little more. So parallel compression, basically, but I like this as opposed to starting with a “dry” snare and blending in the compressed snare. I think I can just feel the impact of blending in the dry snare better than when I do it the other way around.