
Spoken Word Measurements
Feedback drives me nuts. It turns my hair gray. I hate it, but unfortunately it is an ongoing issue in live sound.
The biggest gain before feedback challenge for me has always been and still remains spoken word mics. 99% of our spoken word mics are presently head-worn Countryman E6’s, and even though they are head-worn I still refer to these types of mics as lav’s; whether it’s on the side of someone’s head or clipped to a lapel, the capsules are basically the same type of electret microphones. And unfortunately, they all tend to be omnidirectional mics. I have tried directional mics in the past and found them to be more trouble than omni’s.
So the reason I bring this up is I feel like we’ve been struggling with spoken word in our room for a few months. I just haven’t been able to get it to a level where I’m comfortable, and it’s been driving me nuts since it is an enormous part of what we do. Pushing the mic harder has just put it closer and closer to the edge of feedback, and I have a personal issue with every little, minute bit of feedback that rears its head during a service because it affects so many things. Not only will it be a distraction for those in the room, it will be a distraction for those watching the message at our other campuses, anyone watching online, anyone who listens to a message CD, anyone who downloads a podcast, etc, etc, etc. On a Sunday morning alone, more people will hear the message outside of our room than in it because of our other campuses and the online broadcast. I don’t care if it’s barely noticeable. If I can hear it, someone else can hear it too and at that borderline edge it’s like a mosquito buzzing in your ear if you do notice it at all. Feedback might be a reality of live sound at time, but that doesn’t mean we shouldn’t be doing everything we can to avoid it.
* * * Live Sound 101 * * *
Before digging in on some of the stuff I tried last week, here’s a quick bit about feedback and what causes it; this is going to be a bit remedial so feel free to skim ahead. First and foremost, feedback is essentially an audio loop. Sound is captured by a microphone and reproduced through the PA. The microphone then captures that sound from the PA and feeds it back through the PA and on and on until we end up with an infinite loop. Feedback sometimes builds slowly because the sound from the PA that the mic captures might be low at first, but it grows and grows the more it gets fed back on top of itself.
So why do we hear mostly feedback as a single tone? This is largely because our microphones and loudspeakers are not perfectly linear. The tone(s) we hear are simply frequencies that are more prominent in either the microphone’s frequency response or the PA’s loudspeaker coverage at the microphone position. If everything was completely linear, we might actually hear feedback as an echo depending on the distance between the microphone and the loudspeaker. Unfortunately, most of the time our distance between sound source and loudspeaker is too short to be perceived as an echo.
The simplest way to deal with feedback is to move the source, the microphone, and/or the loudspeakers so that the mic no longer hears the problem frequencies. For example, if your vocalists are feeding back because they stand in front of the PA, moving them behind the PA can make an enormous difference.
Outside of physically moving things around, an EQ is typically used to notch the frequency that’s feeding back. This can be done on either the microphone input or even on the loudspeaker side. At FOH, it is more common to EQ for feedback on the input side. At monitors, it is more common to EQ on the loudspeaker side(wedge or sidefill). If you’ve ever heard someone talk about ringing out a mic, they were talking about using EQ to eliminate feedback. Today I’m going to look more at the EQ side of things.
* * * END Live Sound 101 * * *
Last week I took some time to examine what’s happening on stage and why we seem to be having gain before feedback issues, and I stole a page from the Robert Scovill playbook to do this. When I shadowed Scovi last summer at the Nashville stop on the Tom Petty tour, one of the things he did that caught my attention was to put his Smaart measurement mic at Tom’s stage position after the PA was tuned. Doing this provides a couple of cool pieces of information. For starters, it gives an idea of what the performer is going to deal with coming from the house such as the level of the subs. However, it also gives the FOH engineer a good look at where some problem frequency areas might be. Think about it: if feedback is due to the prominence or buildup of certain frequencies, shouldn’t we be able to measure what those frequencies might be? And you thought FFT’s were just for system optimization.
Figure 1 below is a measurement from our spoken word location on stage. The first thing I can see from the measurement is that it’s a lousy measurement. For the Smaart uninitiated, this is displayed by the red trace at the top of the window which represents the coherency of our measurement. Basically, every time you see a dip in that trace, Smaart is telling us that the data of the measurement might not be accurate. You can also see how our reference trace in blue seems to have holes in it especially above 2 kHz; this is because I have Smaart set to hide lousy data when coherency goes below a certain threshold.
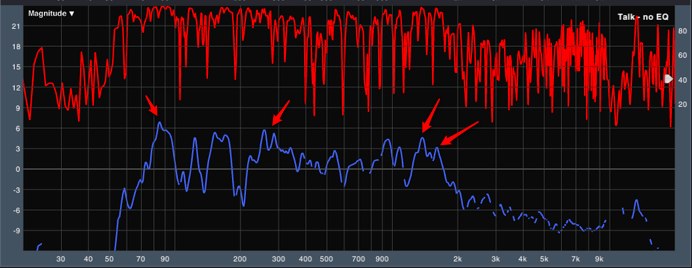
Figure 1: FFT at Spoken Word stage position – No EQ
The quality of the measurement wasn’t a shock to me, though, because I was measuring on stage behind the PA, and just because it’s not the best measurement doesn’t mean I can’t gather any information from it. For starters, I was happy to see the results above 2k. These are a good indicator that the PA isn’t dumping a lot of upper-mid and high frequencies back onto the stage. Less sound from the PA in that region means better gain before feedback in the all important vocal clarity range.
Looking at the rest of the measurement, I saw some inconsistencies of note. Of particular interest to me were some of the peaks poking up; I’ve added some arrows to the image to point them out. I should note that I typically wouldn’t be concerned with this much resolution when working on a system optimization; having too much info while working on a system sometimes leads me to overdo system EQ. However, since feedback exerts itself as sine wave like tones, I was very interested in narrow peaks in this case. These peaks that seem to poke out above everything else are potential problem areas.
* * * Live Sound 101 * * *
A common procedure to ring out a mic is to push it into feedback, notch that feedback frequency out until feedback stops, and then put that frequency back in until the input is just below the point of feedback. I’ve used this method a lot over the years using my ears and also using spectrographs and RTA’s to cheat. The danger in this method, though, is it can be easy to overdo the EQ. You keep pushing the fader louder and louder chasing each frequency as it pops up, but the result is sometimes you end up with so much EQ that you’re essentially turning down the entire signal. Sometimes I see guys continue to push the fader higher and higher even though they’ll never actually need that much gain on the input, and they just end up with a ton of extra EQ.
* * * END Live Sound 101 * * *
In any live sound system there is a point where you can no longer achieve more gain without inducing feedback, hence the term gain before feedback. The goal in ringing out the mic is to attenuate the major problem areas without broadband reduction of the signal which is where we had ended up after months of little tweaks. This time I wanted to try something different since I had all the fancy measurement stuff setup.
A dedicated spoken word bus or group can be an advantage for creating mixes for other environments, but it can also help with attacking feedback. I like to route all of our spoken word mics to their own bus or group and then put an EQ on that bus to ring all of those mics out. Since we’re using the same type of mic for most of our spoken word applications, I can EQ to eliminate feedback at a single point in the signal chain which then leaves me with the EQ on each input to make any tonal adjustments necessary for specific voices. I’ve used 31-band graphic EQ’s in the past to accomplish this, but these days I typically use the Serato Rane 12 band parametric EQ plugin.
So armed with Smaart and my EQ, I set about EQ’ing my spoken word bus. I would typically take a filter starting about 1/2 an octave wide centered at one of the peaks and start attenuating it. Sometimes I would use a narrower filter and sometimes I would use a wider one with the ultimate goal to simply even out the response on stage as much as possible. You can see in Figure 2 below how much smoother the response is at the mic’s position after applying EQ. Figure 3 is a look at the final EQ settings I arrived at.
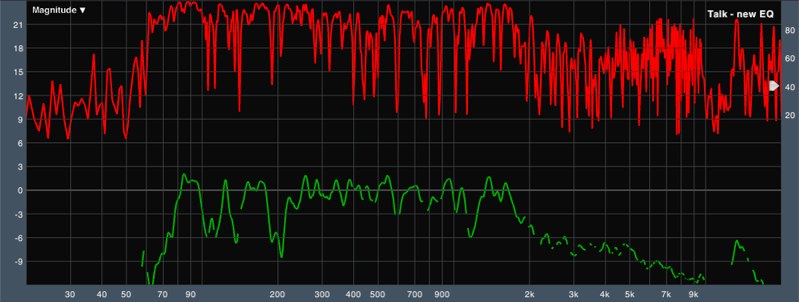
Figure 2: FFT at Spoken Word stage position – EQ’ed
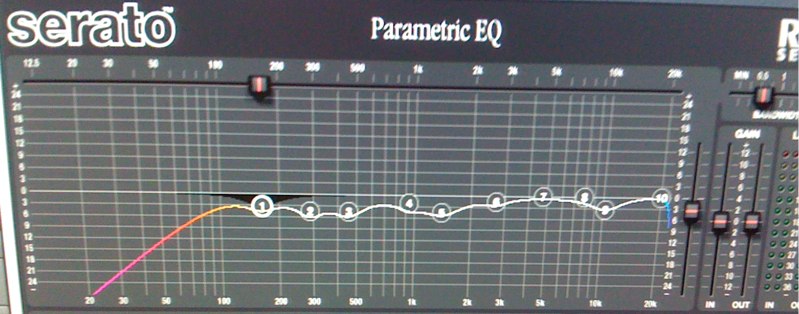
Figure 3: Final Talk Bus EQ
Once I was finished, I turned on one of our spoken word mics and walked out on stage with it. Our Production Director, Seth, helped out at FOH by pushing the fader a bit while I talked so that I could hear where there were still some potential danger areas. With the EQ in place, I pulled up the message from the week before to get our pastor’s mic’s EQ a little more finely tuned for tone.
Now, some of you might be wondering why I didn’t use super-narrow filters to attack specific feedback frequencies. This is really a personal choice. I’ve just found that I don’t like what very narrow EQ filters do to the sound of things. One or two narrow filters can be nice and surgical, but when several are applied I think sound quality can suffer. I’ve found that when I go after feedback with narrow filters–1/3 of an octave or less–there inevitably turn out to be more problem frequencies in the area around the initial problem, and I end up attacking those with additional filters. The feedback gets taken care of, but I find there’s a cumulative sonic quality hit with a lot of filters.
This time I approached things almost more from a system optimization where I’m simply trying to tame things, although I was a little more aggressive than I might be on the system side. I figured if feedback often shows up in clusters, why not use a wider filter centered on the most problematic frequency. For example, measuring showed me there’s probably trouble in the 1k-2k range which was verified when I turned on the mic. 1k-2k is a one octave range, and the biggest issue in there turned out to be 1.6k which just so happens to be in the middle of that octave. So why not use a 1 octave-ish wide filter centered at 1.6k? I just think the end result sounds better than using 2 or 3 very narrow filters in that range to knock out a few different feedback frequencies. I’m not afraid to use narrow filters, but I’d just rather avoid it whenever possible.
The first Sunday on these settings was a success. Dustin from Own the Mix was handling FOH duties and said he didn’t touch any of the EQ I did; he only had to push up the fader. I was mixing in our other auditorium and could still hear a bit of residual edge of feedback stuff during some quieter moments, but they were in the biggest problem ranges I noticed while working with the mic last week so it should be fairly easy to get these under control if they show up again when I’m back behind the console next weekend.
Based on the results, I plan to continue to play with FFT’s for EQ’ing spoken word stuff more in the future when there’s time. While ringing a mic out by ear might still be faster at times, I think in the end this was a little more accurate. I might also play around a bit with the EQ to see if I can put a little bit of the EQ back into the system below 1k, although, the overall gain reduction in that area didn’t seem to be a negative.
 Next Post


I’m curious your thoughts on also doing an FFT sweep with the E6 as your reference mic to see the difference to the measurement mic (since the E6 will have a different frequency response than your measurement mic). Was that something you considered?
I had to get rid of graphic EQ’s on pastor mics. Too dangerous. What you describe of merely bringing all the overall level down at every frequency and merely pushing the fader kept happening over and over. I think a lot of people (guilty myself) try to over-process pastor mics instead of doing what sounds good using the least amount of EQ and compression. I look at it that I want it to sound like our pastor’s voice that I normally hear when I have a conversation with him.
I wasn’t too concerned about the difference in the response of an E6 compared to my measurement mic. I have thought of using an E6 as my measurement mic in this kind of approach, though, because I’m really trying to compare what it’s hearing to a reference signal. However, with my current setup it’s just harder to get the E6 into Smaart, and I didn’t want to have to think too hard about doing this. When I started things, I was mostly interested in measuring what was happening on stage, too, so a specific mic wasn’t really important to me. I hadn’t originally planned on EQ’ing the the bus this way, but thought I’d give it a try while everything was set up.
The response of the E6 is relatively flat, though, so I wasn’t overly concerned at the time, but as I’m thinking about this a bit more, I’m really not generally overly concerned with the response of the mic’s I’ll use in the actual service while approaching things this way. I’m ultimately going to be shaping the sound which is going to play more into how that mic responds to things. In other words, going into the mix I already have a good idea of what frequency ranges I’m going to push on a particular input; sometimes that range is “pushed” by the natural response of the mic and sometimes I push it with an EQ. Either way it’s sort of the same thing.
I guess what I was looking for last week was to get the physical location where the mic was going to be on a more equal plane in terms of what will spill off the PA in that location. In some ways, I think this approach actually gives me more control in dealing with feedback because it puts the burden on the input side. Feedback will most likely result now from something I’m doing to the input or from simply pushing the mic beyond the limit of the system. Smoothing out the system response like I did helps remove it from the equation when problems do arise.
I am always puzzled when I hear other engineers talk about preferring omni headworn mics. It seems like I am the odd one out, so maybe I need to do some additional research. The fact that most manufacturers don’t do a cardioid headworn would suggest that they are not as popular. For me, a cardioid DPA can get probably 4-5 db louder, and sound better at that volume as well.
I’m mixing at a couple of different churches these days. Both have cardiod DPA’s, and then I have an assortment of other headsets, like countrymen and audio technica mics, which are all omni. Packs vary between Shure and Senny. In virtually every application, the cardioid outperforms the others by sounding better, and offering much more gain before feedback.
The fact that it sounds better is mostly based on the fact that there are very little room reflections/PA spilling back into the mic.
Of course, this is a DPA we are talking about. So I would be interested to compare the omni dpa to the cardioid. But I have also used a directional E6 and I had the exact same experience.
But I can’t recommend the mic highly enough. It’s a DPA 4088-F. The difference in volume and sound quality is very significant. Another benefit of the mic is that it can take very significant DB levels, so you can get it as close as you want, and you will not get any nasty clips. It just needs some extra juice at the console.
Cardioid headworn mics tend to be much more sensitive to mic position. If they get too close to the talent’s mouth, they don’t pop, they explode. Some of them also exhibit much more handling noise so if they shake or rub against the talent’s face, it can be much more obnoxious. A lot of time those problems don’t show up in soundcheck, either, so when they start to happen you’re halfway through a talk and there’s nothing you can do.
I prefer omni’s because I can ballpark it on someone’s head and not worry about it as much. It’s much easier on the talent as well because we can soundcheck relatively quickly and don’t have to spend a lot of time fidgeting with the mic.
I think ALL the DPA headworn mics sound better. We have a couple 4066’s in our inventory, but I hate the way they look. It’s like there’s a thumb on the side of their face. Plus most of the folks who speak in our rooms find the DPA headband to be uncomfortable, but I know a lot of people don’t mind them, though. They are great sounding mics if you can get away with using them.
That’s a plus about the DPA cardioid… it doesn’t explode. I’ve had speakers literally scream at the top of their lungs into them. You just can’t get outrageous clipping from that diaphragm. And the great thing about the way the DPA is worn is that it ends up in the same place, always. Unless you intend for it to go elsewhere.