Attack & Release – Part 2
In part one of this series I talked about how the Attack and Release controls on a compressor can be used to help shape a sound. I also explained that these controls are the speed controls for your compressor, and then I took a closer look at the Attack control. So today let’s look at the Release control. This is going to be a longer article, but my hope is that if you haven’t mastered the Release control maybe this can get you on that path.
If Attack is the speed control for our compressor’s attenuator, Release is our speed control for when our compressor stops attenuating. In other words, the Release knob controls how fast the signal gets turned back up after it has been turned down by the compressor.
The problem with Release is I believe it can make or break your use of a compressor, and at the same time I think Release is one of the hardest parts of compression to get a handle on hearing. I can’t speak for anyone else, but I know for me it has often been elusive to pick out exactly what adjusting the Release control does to the sound. So I want to offer you some ways to look at and listen for Release.
The first key to me in understanding Release is actually to not listen for it because it’s probably not doing what you think.
What?!?
Seriously, if you start listening for it you’ll start listening too hard and thinking too hard, and that’ll derail you because in my experience Release doesn’t sound like you think it’s going to sound like. So what do I mean?
If we go with the automatic fader analogy where we think of a compressor as an automatic fader turning things down and back up, the Release control adjusts how fast the fader gets pushed back up. Your instinct in hearing this analogy might be to listen for something fading up, but there’s a potential problem with that idea because a compressor’s release is generally much faster than we are ever used to hearing something fade back up.
So how about a different approach?
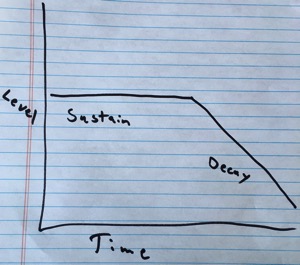
Think back to Sound Envelope 101. We dealt with the attack side of the envelope last time when we talked about the Attack control. That leaves us with sustain and decay, and as you may recall decay is also sometimes referred to as release. Guess what we’re going to be playing with in the sound’s envelope when we adjust our Release control.

I want you to picture the sustain and decay portion of a sound as level over time. For the sake of simplicity, picture the sustain in your head as a flat and level line and the decay as a line that’s sloping downward. Keep those two pictures in your head.
Let’s say we’ve been compressing a sound. Our compressor was adjusted to provide gain reduction during the sustain portion of the sound. So while the sound sustained, the compressor was always turning it down. As the sound decays, however, the signal level drops, and as the signal level drops what do you think happens with our compressor?
If you guessed the compressor begins to release, you are correct.
Wait wait wait. Doesn’t the signal level need to drop below the threshold for the compressor to start releasing?
No, because just as the amount of our compressor’s attenuation is linked to the amount of signal that crosses the threshold, as less signal comes in the compressor will begin turning back up. This is because how much compression/attenuation that happens is controlled by our Ratio control.
*** Gratuitous Math Example ***
For example, let’s say we have a compressor set to a 4:1 ratio. For every 4 dB that comes in, we get only 1 dB of signal level above our threshold. The Ratio makes it harder for things to get loud. So if we pump 8 dB of signal in above our threshold, we only get 2 decibels out above our threshold which means the compressor does 6 dB of attenuation because 8-2=6 dB. When our signal level drops to 4 dB of signal above the threshold, we get 1 decibel of signal above our threshold which means we’re still getting 3 dB of attenuation because 4 dB – 1 dB = 3 dB. If the signal then went back to 8 dB above the threshold, the compressor would attenuate it back down 6 dB.
*** End Gratuitous Math Example ***
I apologize for using math, but I know sometimes this helps people understand things. Don’t worry if you’re confused because ultimately the math isn’t important since we’re ultimately trying to hear what this sounds like. My point is, a compressor is always attenuating or restoring attenuation once a signal crosses the compressor’s threshold. What’s important in that equation this week is the Release control adjusts the rate the signal gets turned back up.
Let’s go back to the picture of our decaying sound: the downward sloping line. If the compressor begins to turn our sound back up as it decays, what do you think is going to happen to our downward sloping line’s level over time?
Think about it.
As the signal drops a bit, the compressor releases a bit and turns the signal back up a bit. The process continues until the compressor has completely released or turned the signal back up to its original level. So in effect, our compressor is pushing up against our downward sloping line. As the compressor releases it makes it harder for the sound to decay, and if we time our release just right we might even be able to transform our downward sloping line into a pretty flat line; we won’t be able to go completely flat because at some point the natural decay will overtake what our compressor is doing.

Now go back to our picture of the sound’s envelope of level over time. What portion of our sound’s envelope does a flat line resemble?
The answer is SUSTAIN!
So if a releasing compressor makes our picture look like it’s sustaining, what do you imagine the Release on a compressor sounds like?
Again, the answer is sustain.
Sounds so simple, right?
Well, it is and it isn’t, but you shouldn’t be surprised because I told you Release is a tough nut to crack.
Release can greatly affect a sound’s sustain. In fact, I often tell people in workshops and one-on-one training sessions to think of Release as the Sustain control. Setting the Release longer/slower may increase a sound’s sustain while a faster/shorter Release setting may decrease it back to its normal-ish amount. This can be a good way to look at some uses of Release on instruments with a natural sustain component such as a guitar or piano. However, I don’t think this helps if we’re working on something like a vocal.
That’s OK, though because I have another strategy for learning to understand Release. I think this strategy is potentially tougher because we’re entering the world of feel with it, but this is often more along the lines of how I personally approach using the Release control.
I often think of Release kind of like the vibe control for the compressor. A faster Release setting will tend to make things more exciting, aggressive, or urgent while a slower setting will smooth and/or mellow things out. Similarly, a faster Release will bring things forward and more “in-your-face” while a slower Release setting will push things away and deeper into the mix. Maybe a few hypothetical use examples will help with this idea.
I generally want a snare drum to explode in the the mix. I want it aggressive and forward so I will usually set the Release pretty fast. The same thing goes for a lead vocal because I want it up front and forward. On the other hand, when I parallel compress drums, my parallel compressor may get a slower release relative to the individual drum because now I may want to bring out more of the body of the drum by lengthening or sustaining it longer so I can blend that in with my original drum sounds. Background vocals might get a slower Release setting relative to the lead vocal as well so I can push them back a bit from the lead vocal. I might give a bass guitar a somewhat slower release as well because I’m might want to smooth out the playing and provide a more solid and longer foundation, although, truth be told I probably go fairly fast on a bass guitar’s Release as well. The point is, these aren’t hard and fast rules because every situation is unique, but hopefully this gives some insight into this idea.
Another way to start learning to hear Release is to recognize when you’ve set it wrong, and sometimes this may be the easiest way to hear Release or at least begin recognizing it. So let’s talk about troubleshooting your compression and how to fix it because in most situations I find it’s the Release setting that’s likely causing the problem.
If your Release is set too fast, you might hear the compressor pumping in an unnatural way where the volume comes up too fast. Pumping isn’t always bad, and in a lot of EDM pumping is used as a rhythmic effect. However, if you hear a sound pumping in a way that fights the rhythm of the song or draws attention to itself in a non-musical way, your Release might be set too fast.
Another sign your Release is too fast is distortion. This shows up most often on sounds rich in low frequency content such as bass guitars. In these instances, the release can happen so fast it creates a square wave which we hear as distortion. Sometimes this can be a pleasant thing that can help a sound in the mix, and in truth, part of the thing about compressors we often like is the added harmonic distortion that happens as a result of the compression and compressor’s circuitry. Sometimes the distortion is not very musical and sounds out of place, though. In those cases, try slowing your Release because it might be set too fast.
But what about too slow of a Release? To me if something sounds choked or like it’s being clamped down or squashed or held back, that’s probably a sign the Release is too slow. It could also be a sign you’re compressing something too much, but if you hear that effect with only a modest amount of gain reduction happening try going faster with the Release.
This brings up a good point on Attack and Release. The most common error I see engineers make with compressors is setting their Attack too fast and Release too slow. Unfortunately, some of the default settings on digital consoles don’t help this, either. For example, as memory serves the default settings on a popular manufacturer’s channel compressor are 10ms Attack and 500ms Release. A 10ms Attack is often a safe place to start, but 500ms for a Release is, in my experience, pretty slow for what I want out of a compressor in most applications. Personally, I think 100ms is a better place to start with Release, but faster may still be preferable in many applications. That doesn’t mean there would never be a time I would use a 500ms Release setting, and you shouldn’t run away from 500ms just because I said it’s pretty slow. Turn the knobs and start teaching yourself to hear what they do so you can find the settings YOU that work for what YOU’RE trying to accomplish in your mix.
Now, let me try and wrap this all up for now.
I think the question you should always ask yourself what you are trying to achieve by compressing something. Do you want something to be aggressive and forward or are you trying to smooth something out? Do you want to make something punchy or soften its blow? If you have the answer to that question before you start turning knobs, it can be easier to find the setting you’re looking for.
Learning to hear compression is a process, and you are probably not going to learn how to hear this stuff in the thick of battle with a band on stage. Maybe you can, but it’ll probably take much longer to refine your ability if you’re also trying to make a rehearsal/show/service/etc. happen. I believe your best bet is to take some recordings of instruments and pipe them into a compressor and start spinning knobs until you get it. This also probably won’t happen on the first try, but it will happen faster than during show mode. And once you do get it you’ll be able to apply your understanding in the heat of battle.
Also, try not to get discouraged if you’re having a hard time learning to hear this stuff. Compression is hard to hear at first. Part of the difficulty is it can be a subtle effect when done right and it’s not typically something we naturally listen for. I also think part of the difficulty is because pretty much every recording EVER has had some form of compression done to it. If it was recorded to tape, the tape compressed it to some degree. If it was ever broadcast, there was some kind of compressor/limiter in the broadcasting chain that hit it. I believe speakers themselves also compress things, and microphones can also impart this effect; do you really think dynamic microphones capture every detail? Even our eardrums themselves can compress depending on the level of sound hitting them.
So what I’m getting at is, the sound of compression is everywhere which is part of why I think it’s sooooo hard to hear at first. We’re used to hearing it. So don’t get discouraged if you’re having a hard time hearing compression. Put on some recordings and loop them until you can’t take it anymore while you turn the knobs slowly one at a time. It will likely take some time to get your ears wrapped around it, but if you keep practicing I think you’ll be able to hear this stuff to the point where you can use it for fun and profit.

 Next Post


Dave, this has been an awesome series. Will you continue and go into detail on ratio?
Thanks, Duane! I wasn’t originally planning on going any further, but then I started writing about Ratio. Might be a week or two…or more, but it’s coming.
Dave,
Looking forward to it.
This is such an interesting not to mention educating series! Thanks for doing this. It will really help newbie DJs like me improve in our craft!