Load-In and Load-Out – Part 2
Last time out I was talking about portable church situations and getting gear in and out. Today I want to look at infrastructure and wiring everything up.
On stage I have always been a big fan of drop-snakes for both portable situations and permanent installs. Personally, I can’t stand floor pockets because they limit flexibility, and you are always one input short of what you need. Overtime they also tend to fail and are never as easy to repair as you’d like so they just end up not being used. Drop snakes, on the other hand, offer a lot of flexibility and an easy way to upgrade your capacity if needed. Plus they’re relatively easier to fix.
In terms of how many drop-snakes to use, it all depends on how big the band is and the staging needs. I like to start with 2 snakes up-stage for a typical 4-5 piece band with one snake stage right and one stage left. Each of these should be large enough to accommodate a full drum kit plus a couple more inputs. Some small portable churches might be able to get away with a single upstage drop-snake depending on their instrumentation. In addition, I like to have at least one drop snake that is downstage for any frontline needs. You can wire downstage instruments from upstage, but a lot of times it’s just neater to be able to have something downstage.
Now, a few notes about running cables. Some of this is personal preference, but I always like to think in terms of load-out when it comes to setting things up. The first couple of times you are portable you won’t mind things taking a little longer, but the more you do it the more you’re going to just want to be done. Keep an eye on the FOH crew the next time you’re at a concert, and you’ll understand this when you watch them start shutting things down and packing up during the last 1 or 2 songs.
I do not like running a lot of stuff under staging or risers and around legs and stairs that cables will get caught up on at the end of the day when you’re trying to wrap them. Instead I prefer to group things together as neatly as possible and run them straight from upstage to downstage(preferably as close to the stage perimeter as possible) and/or from left to right. In most venues the first couple of rows are probably the ONLY people who are going to see the stage floor so as long as you keep things neat and together and don’t have a rat’s nest anywhere or cables snaking across the stage at odd angles, it’s going to look fine and be safe. You might want to tape down cables that will be walked across to avoid tripping when doing this, but that’s not always necessary. If you do tape cables, you don’t have to coat an entire cable with gaff, though. Just secure it down. Lots of tape to remove will add time during load-out.
There might be some debate on this, but I was taught that when you are pinning a stage you put the excess at the talent’s position and NOT by the snake head. This way you can easily reposition someone on stage, but more importantly you don’t end up with a bird’s nest of cables at the snake head. Big piles of excess cables–coiled or not–will add time at the end of the day.

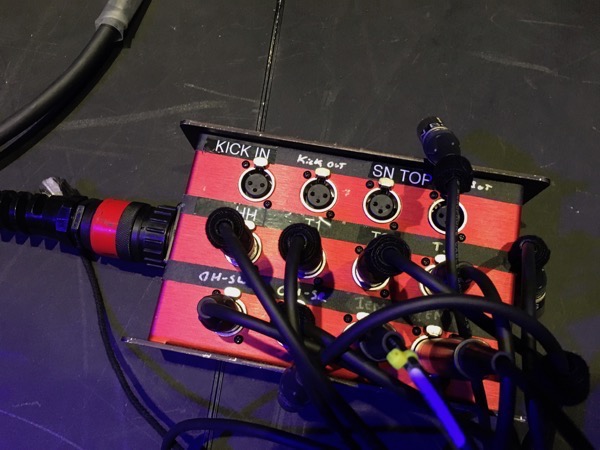
If you’re wiring the same things to the same inputs every single week, labeling can also be a big help. For example, consider mic’ing a live drum kit. You can take all of those mic lines and loom them together to create your own mini-snake. Then label each end with the mic that should be connected. Finally, you can label the drop snake with those inputs. This saves time when you’re wiring things up and also makes the task easier for entry-level crew.
Another thing that is a big help is color coding connectors. This is very popular in the touring world and can be done with colored electrical tape. Here are a couple examples:


I also believe that delegation can benefit load-in and out. Things always seem to go faster whenever I’m working on a crew where everyone has specific tasks assigned. When you have a load of cases full of cables and other gear or a stage that was just used, I think it can sometimes feel overwhelming to a lot of people. They don’t know what everything is or where everything goes and instead of taking initiative people end up standing around looking for something they wouldn’t mind doing instead of just doing the first thing that needs to be done. Another problem that sometimes comes up is multiple people try and take care of the same task which messes them all up slowing everything down. What? You’ve never ended up coiling a long cable while someone tried coiling the same cable from the other end?
So make a list of all of your equipment to start. This will give you a handy inventory for you to keep track of things, plus you’ll also have a list you can assign crew members to. For example, when I mix at Decatur City Church, for load-out I have to get the FOH console shut down and buttoned up which includes backing up my show files. Then I get the various snakes to FOH coiled up and put away as they stay on-site. Next I get any other cases at FOH buttoned up, and then I head to the stage and collect any microphones and DI’s that weren’t put away and get those in their cases. Any audio cables still on the stage get wrapped and go in their cases next. Finally I grab any mic and guitar stands and put those away. By the time that’s done it’s usually time to start pushing audio cases to load them out. I know what I need to do every time which makes it very easy to just check things off in my head. Sometimes the order I do things might get changed up a bit especially if there are still a lot of people in the room and FOH needs to keep running, but I still have that “list” I know to tackle.
One last topic I want to mention is Maintenance. Fixing things when you’re portable isn’t always easy so there are a couple of things to think about. For starters, I think it’s very important to purchase equipment and cases that are durable and road-ready. This can be a challenge because a lot of portable churches are also limited in resources, and in those cases I think it may sometimes be better to scale down some things instead of cutting corners on durability.
For example, wireless microphones are far more popular, in my opinion, than they should be, prone to damage, and expensive to fix. Low and mid-level RF gear often tend to be more plastic than metal, and it’s just a matter of time and often not much time at all before plastic breaks.
The thing is, most churches–and especially portable churches–don’t need wireless microphones for most of the sources they put them on. For example, if you have vocalists standing in the same place the entire time they are singing, they don’t need to be wireless. Hardwiring those mics instead would not only save a bunch of money in equipment and expendable costs(no batteries), but those wired mics will probably be far more durable and last a lot longer. When’s the last time you held a real SM58 in your hand? They actually have a bit of weight and are quite a bit more durable than some of the wireless iterations using the same mic capsule. But don’t take my word, check out some video putting a 58 and some other Shure mics through the ringer.
Portable gear, regardless of its durability, will still take a lot more wear and tear than in an install so it’s also a good idea to have spares and backups available for anything mission critical. That doesn’t mean you need two DPA headsets and a spare RF setup for your pastor, though. It does, however, mean you should probably have a hardwired spare handheld ready to go along with a plan he understands to follow if his mic isn’t working on a Sunday. Having multiple FOH consoles is probably out of the question, but a small 4 channel analog mixer will still output to your PA and offer an input for your pastor, an acoustic guitar or keyboard, and a couple microphones to get through a Sunday.
Finally, get stuff that breaks out of rotation and fixed as soon as possible. Don’t wrap red tape around a connector and throw it back in the bin. Take it with you when you leave after services and either fix the connector or throw it out and replace it. It’s also a good idea to schedule time at least once a quarter where you can do routine maintenance on gear. Find another location if you have to where you can load your gear in to a “shop” so you can clean and test things and make sure it all works. This is also a good time to do any software updates or refreshes because it’s not a good idea to do those in the “field”.
So what have you found that works for you in a portable situation? Is there something you’d like to hear my take on? Please let me know in the comments.
 Next Post


Teach people how to do one job at a time get them wrapping cables properly, teach the singers how to set up and pack down a Mic stand, have rack drawers in the amp rack and wireless rack for patching and have different types of cables different colours e.g. Patch leads are green, mic leads are grey, jack leads are red. Speaker leads orange. We also have different colour leads for different installed venues also to make sure leads come back to where they belong.
If a bit a jack lead for a musician I’ll make sure it’s a colour we don’t use
Finally always have a electrical socket / outlet tester and use it regularly both on venue sockets and extension leads