Console Mix Anatomy – Part 2
In Part 1, I looked at some of my standard setups for Groups and VCA’s. Today I’ll look at how I modified and repurposed the Groups and VCA’s later on in that same service.
On the Sunday I used for my example in the last post, we had a standard worship set, however, we performed a closing song that day that made use of a completely different band setup. The closer band consisted of an acoustic piano, a cello, and two vocals. The piano was mic’ed with a pair of DPA 4061’s along with a pickup mounted under the piano, the cello was mic’ed with another DPA 4061 connected to a wireless bodypack to ease the stage transition, and the vocalists were on a couple of wireless mics.
I created a group specifically for the piano that day since I had an extra I wasn’t using. Assigning all the piano inputs to a single group made it easier for me to process the piano as a single instrument. On the group I was running EQ, compression, and finally a reverb. I don’t typically like to insert reverbs on an input, but since it was a single song I made an exception. I then used the wet/dry control on the plugin to achieve the blend of direct and effect I liked.
While I initially tried to approach the song without changing my VCA’s, there were a few things happening that led me to the decision to redo them for this particular song; snapshots came in very handy on this particular day. For starters, the song was actually starting as an underscore to a video that preceded it. So I knew I needed a way to keep all my band inputs available while retaining access to the program elements that preceded the song. Plus as I started working on the mix for the song, I realized there was more I wanted immediate access to than normal.

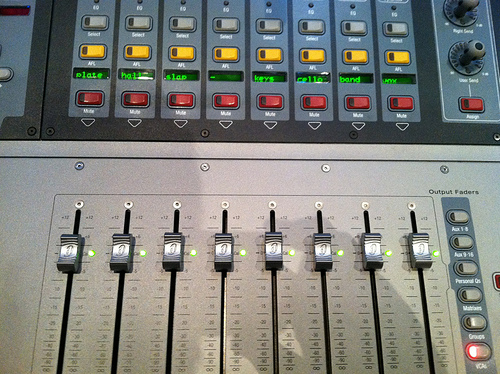
The photo here displays where I landed for my alternate VCA’s: plate, hall, slap, (empty), keys, cello, band, and vox. The first three VCA’s were tied to specific vocal FX returns, the piano inputs were assigned to the “keys”, and I think the rest are self-explanatory.
The vocal FX on this particular song were pretty important to me which is somewhat atypical for me. Since the song was so sparse, I used a lot more FX than usual to help it feel more real to me. The sparseness also made the FX a bit trickier because I was trying to keep them subtle which required a bit of riding them at times. Once I knew I would want to ride them in sections, I decided to put them on VCA’s so I wouldn’t need go find them in the FX return bank which also happened to be sitting under some key inputs I would need for programming elements on the front and back of the song.
In terms of actual FX, I started with a hall on the vocal, even though the original recording was actually a lot drier than what I ended up with. My hall wasn’t overly prominent, but it was definitely there and felt like it fit the performance our musicians were doing better than the original vocal treatment on the record. In the very beginning of the song I pulled the hall back a few dB to keep from drawing attention to the effect, but then I pushed it back up in the middle of the song when the dynamic intensified and the BGV came in. Finally at the end of the song when everything pulled back, I pulled the hall back probably 10 dB which gave the vocal an intimacy I thought fit well with the emotion and dynamic of the music at that point after the hall had been present through the song.
Pulling the hall that far back created a different problem because I found the vocal became too dry at the end. So I added a shorter plate in to help the vocal still feel real at the end which also helped the front of the song as well.
The slap VCA refers to a single delay that wasn’t actually a slap, but it was a single repeat delay and I tend to label those as slap because it helps me differentiate them from my other more echo-y delay I like to ride in and out. The slap on this song was set to a 1/4 note delay and was just something that I liked under everything. I also had my normal delay under my left thumb that I rode up coming out of the bridge.
While I could have mixed the song without reassigning my VCA’s, having everything in at close hand instead of spread across the desk made things a lot easier. The result was I could focus harder on the musicality of things instead of figuring out how to reach things. For this song I literally had everything I needed right under my fingers, and I think it made a big difference in the mix.
I guess if I have any point to these last couple posts, it’s that you should really think deliberately with how you approach setting up your console. Seasoned musicians don’t typically spend a lot of time looking for notes on their instruments when they’re playing. If what we’re doing is to be musical in nature, I think we should be striving for nearly the same ability. There’s nothing wrong with glancing down at a console, but when we spend more time with our heads buried in the console searching for the right knobs and faders, the mix will suffer.
 Previous Post
 Next Post


Dave,
Thanks for this stuff. Really enjoyed it – It was you, Chris, and Dustin have been super helpful with our audio.
Dave
Fantastic!
What is your work flow on the console when you are mixing musical productions for Christmas which have speaking parts and music?
Is this done in the same space where the worship services are?
We don’t do musical productions. And it has been so long since I’ve done one, I’m not sure how I would approach it.